Followers

Sunday, 8 September 2013

Finnabair workshop 3: 'Prima Goes Inky - Part 1

The Sunday 1st September morning session was workshop 3 entitled 'Prima Goes Inky - Part 1' and  included plenty more yummy products in order to make canvas journal covers.
As always Anna provided the step by step 'how-to' guidance and there were plenty of Anna's projects on display to look at for inspiration if needed.
This workshop was also fun and involved lots of inking and drying and I love how my canvas journal covers turned out - the colours, the embellishments and the style.
And the next photo doesn't even begin to show how inky my hands were at the end of the session...
It really was a case of roll on part II...

Thanks for looking!
Tracey x

Finnabair workshop 2: 'Imagine Collage Canvas'

The second Finnabair workshop I attended on the 31st August was entitled 'Imagine Collage Canvas' and was just as amazing as the first class. Again we received a bumper pack of products to use and of course I was determined to use every single item in true Finnabair style.
There were plenty of tutorials along the way and Anna makes it look so easy with her relaxed approach to mixed media art.
Now unfortunately I was very silly and forgot to take my own photos with me so for this project I adopted a fake ancestor and this is my finished canvas.
Well what a great first day it was and I went back to the hotel feeling tired but very happy and excited for the next workshop.

Thanks for looking!
Tracey x

Saturday, 7 September 2013

Finnabair workshop 1: 'Industrial Baroque Tea for 2

Last weekend I was extremely lucky to attend 2 whole days of workshops at Snazzys in Swindon with Anna Dabrowska aka Finnabair. I've long admired her style but hadn't tried to recreate it before.

Saturday morning was a class called 'Industrial Baroque Tea for 2'. We used lots of goodies from Anna's Prima range for our project as you can see from the kit photo below.
Anna is another great teacher and there was lots of very messy inky fun to be had during the morning. The class moved along at a good pace to keep on track and Anna gave us great tutorials through each step of the project. It was so much fun and best not to over think it!
We made a stunning layout and I challenged myself to use all the components in order to recreate Anna's style on my page. Now I wouldn't normally use so many embellishments on one piece but the outcome is simply gorgeous and I love it!
At the end I asked Anna to sign my layout close to the embellishments on the left and intend to print out the photo of myself and Anna (below) ready to add to the lighter space between the embellishments on the right to complete my page.
It was an absolutely wonderful morning and even better there were still 3 workshops to go! I'll be back with details of workshop 2 soon.

Thanks for looking!
Tracey x

Monday, 2 September 2013

Happy birthday PaperArtsy

This evening I've had a project posted as part of the PaperArtsy birthday celebrations #3Up challenge. As always there's lots of inspiration so it's definitely worth stopping by the PaperArtsy blog for a look!

So a little while back I received a parcel from Leandra containing numerous goodies including a canvas, a set of cat's meow stamps, ribbon, card stock, embellishments etc. At first I was a little stumped for a project idea but then finally and just in time my crafting mojo (which has been missing for a couple months) returned and I ended up making a hanging.  This project was quite a challenge but I loved the opportunity to be able to take part!
Thanks for looking!
Tracey x

Wednesday, 12 June 2013

Tickets please...

Today's post is my entry to the current challenge at Out of a hat Creations #63 'Tickets Please', now I love to travel so wanted to incorporate this in my project but without making it look like a travel piece. Due to being a bit last minute recently, this is my third blog post using the iPhone blogger app, I really must look at my blog on a pc to check how they are appearing full size.

I used cardboard and twine to make a hanging plus the Stampin'Up top note die, stamps by Papermania, PaperArtsy and Tim Holtz, brown distress inks, glossy accents, rock candy crackle distress paint, picket fence distress marker, film strip ribbon and clear gems.
Thanks for looking!
Tracey x

Sunday, 9 June 2013

A third workshop with Hels

Yesterday I attended my third workshop with Hels Sheridan at Birds In The Barn and as always we had a fantastic time crafting, chatting and learning new techniques. The project was called 'The Curio Shelf'.

We used Studio490 art parts and stamps plus Tim Holts distress inks, stains grunge paper, swivel clasps, film strip ribbon and die cuts. We also used treasure gold and a number of small embellishments. I just need to find my seed beads to go in the bottle.
Thanks for looking!
Tracey x

Wednesday, 5 June 2013

Jewel In The Crown

I have been in my craft room tonight in order to create my entry to this week's challenge at Out of a hat Creations which is #62 'Jewel In The Crown'. Now with our Queen celebrating at the moment I thought I'd make this my theme.

I used a crown template which I found online, printed and cut it out. I stamped a background using the flag from the Artistic Outpost London underground set then used Tim Holtz faded jeans and barn door distress inks to colour.  I glued the paper crown to some cardboard to make the piece sturdy. Next I stamped 3 of the Tim Holtz crown in embossing ink and heated with gold embossing powder and inked with brushed corduroy.  I stamped my sentiment, again edging in brown and them added gems. Finally I attached a second class stamp behind a Tim Holtz facet using glossy accents.
Thanks for looking!
Tracey x

Wednesday, 29 May 2013

Butterfly Dreams

Finally the 'Jade' products I ordered arrived today, so this evening I have spent time in my craft room creating my entry for this month's challenge over at 
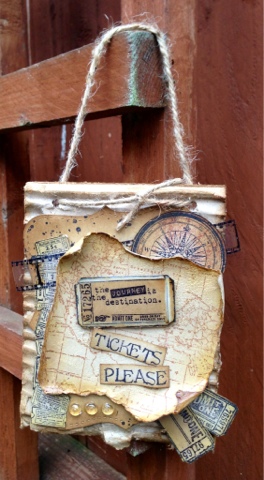
Bombshell Stamps (nothing like last minute)!  I received the Butterfly Dreams set this month and knew that I wanted to use these but Ms. May really did challenge me as she set a colour (grey, jade, gold, silver, white) and a texture (dry embossing, scrolls, scallops, satin ribbon, metallic glitter etc.) theme.  Now I had nothing 'jade' in my craft stash except for a couple of hat pins so in the end I purchased a pot of Cosmic Shimmer ultra thick embossing crystals and a Copic marker to use on my project, I tried for a sheet of Bazzill card stock too but it was out of stock in the end.

So apart from the Bombshell Stamps, Copic pen, Cosmic Shimmer embossing crystals and the hat pins, I used the Tim Holtz tag and flourish dies, Cuttlebug divine swirl embossing folder, silver gems, Angelina fibres, white and gold card stock, brown, silver and gold ink, Sakura gold shimmer gel pen, a grey promarker pen, Tim Holtz rock candy distress crackle paint, Tim Holtz crinkle ribbon, Tim Holtz embossing ink, a gold wax pellet, gold and silver ribbon and double sided foam.
Thanks for looking!
Tracey x

Tuesday, 28 May 2013

'F' is for Friendship

The eleventh letter in the The Craft Barn alpha challenge is 'F' but with the additional challenge to use a word between FE and FR so I have chosen the word Friendship.

I started with the usual piece of 6x7 inch white card stock and punched the 2 holes on the correct side of the page so that I can eventually add it my book.  I glued the dictionary page to the card stock and inked the page (excluding the word and definition) with the Tim Holtz tattered rose, seedless preserves and picked raspberry distress inks. I spritzed with water, dried and went round the edges with a Dylusions flower stencil to remove some of the colour before drying again.  I stamped the Creative Expressions tatty button girl twice, a small Tim Holtz butterfly 3 times and then created an edge using the Prima brick wall stamp.  I coloured the images with Promarkers and added black pen lines and gold Ranger paint dabber round the edge of the page, plus a few splats of picket fence distress stain over the brick effect.  Next I die cut the appropriate Tim Holtz alphabet letter and stamped my chosen word onto black card stock.  Finally I doodled around the word and definition and covered with Tim Holtz rock candy distress crackle paint.
Thanks for looking!
Tracey x

Monday, 27 May 2013

Purple, Blue and White

I have been in my craft room this morning and managed to complete my entry for the Tando Creative May challenge which is to use the colours 'Purple, Blue and White'.  I bought a new set of stamps during a trip to Birds in the Barn a couple of months ago and thought that they would work well for this challenge.  It is always worth popping by to take a look and join in with the challenge and this month they have a DT call too (are you tempted, I am...)

I started with a Tim Holtz die cut tag which I coloured using Tim Holtz faded jeans, salty ocean and seedless preserves distress inks.  I spritzed the background with water, heat dried, added black pen lines to the edge and then stamped 3 of the Katy Sue Designs Limited Fabulous Shoes collection 2 images.  I stamped the main image onto white card stock, added the dragonfly and then cut out using the Spellbinders lacey circles before colouring with blue and purple Letraset promarkers.  I used a Sakura glitter pen to add sparkle to the outside of the shoe, the edge of the leaves and the dragonfly wings on the background and then covered the flower and dragonfly wings on the circle with Ranger glossy accents.  To finish the main piece off I added colour dots with the promarkers and a faux stitching with a black pen to the edge of the circle and attached it to the tag using double sided foam tape.  Next I added a clear stone to the centre of the flower, 3 gems to the background and 3 colours of bakers twine through the tag hole and secured using 3 Tim Holtz tiny attacher staples.
Thanks for looking!
Tracey x